- safety glasses
- #2 phillips head screwdriver
- wrenches
- 16mm or 5/8"
- '94 & LATER - 17mm or 11/16"
- 2 - 9/16"
- 10mm
- drill w/ 3/8" drill bit
- jack and jack stands
- hack saw or aviation snips for cutting package shelf and interior
panels
- belt sander or half round file for fitting plastic interior panels
- T-40 torx drive for removable hard top latches - obviously not everyone
will need this one
1) This step is my favorite part: PUT THE TOP DOWN!
2) REMOVE THE TRIM PANELS COVERING THE SEAT BELT TOWERS. (THESE
PIECES ARE CALLED QUARTER TRIM BY MAZDA.)
First remove the metal cap at the top of the panel just behind the door.
This is held in place by a threaded fastener that is used to attach the
top boot (10mm) and a Phillips head screw on the pre '99 cars. The M2
version is similar but an extra rubber molding has been added that is
held in place by a plastic insert inside the top of the doorjamb and another
under the lip of the body just behind the door.
Remove the weather-stripping that runs along the front edge of the trim
panel at the rear of the door opening. (you might find it necessary to
loosen the 4 Phillips head screws in the scuff plate that runs along the
bottom of the doorsill on some early models)
Remove the plastic cover from the shoulder harness guide (it just snaps
off), loosen the bolts and remove the bolt and spacers from the guide.
On the '94-'97 models Remove the cockpit brace end covers (they also snap),
loosen the bolts and remove the cockpit brace.
There is a small plastic clip at the rear of the trim panel just behind
the hole the shoulder harness guide bolt goes through. Remove the clip
by pulling it toward the rear of the car.
Remove the rectangular seat belt trim ring at the front of the panel and
the 2 fasteners in each trim panel located on the inside just above the
package tray, one is a kind of plastic rivet that is loosened by lifting
the center portion and pulling it free, the other is another one of those
fancy boot cover snaps with the 10mm head. If you have a '99 with the
wind blocker remove the screws and lift the wind blocker out. The trim
panel can now be removed by pulling it toward the center of the car, there's
a couple of snap type fasteners down low just behind the door that you
will need to pop loose as the panel is pulled free.
3) PUT THE TOP UP - Remove the carpet from the fuel tank cover
(the silver cover that makes up the front part of the package shelf) and
fold it back. A claw hammer is a good tool for removing the plastic carpet
fasteners. Lower the top. (Pre '99 leave the window zipped in, be careful
not to crease the window) Some sort of cover for the window is not a bad
idea. Remove the large silver metal fuel tank cover that makes up the
front part of the package shelf by removing the several bolts w/ 10mm
heads that hold it in place and releasing any wire loom fasteners. Lift
the cover up and out of the car.
On the '94-97 models there's a computer mounted behind the passenger seat,
the outer mounting bracket will need to be modified and the upper mounting
stud removed to allow clearance for the roll bar mounting plate. (FIG#
8)
If you are installing an original design HARD BAR SPORT or a HARD CORE
HARDTOP Only you will need to trim the package shelf area just behind
the fuel tank cover opening as shown in (FIG#
5). You will also need to remove the spare tire and the metal
panel at the front of the trunk on the driver's side (the one with the
jack handle attached) if you are working on a pre '99.
While it's not absolutely necessary to do so, I find it helpful to remove
the front trunk panels in the M2, they are held in by several of those
nifty little plastic rivet fasteners.
If the car has antilock brakes and you are installing an original design
HARD BAR SPORT or a HARD CORE HARDTOP you will need to relocate the ABS
sensor wiring harnesses. Jack up the rear of the car and support with
sturdy jack stands. Remove the wheels and the plastic inner splash panels.
The harnesses run from the sensors, mounted next to the brake rotors,
up through rubber bulkhead plugs in the areas just to either side of the
fuel tank. Trace the harnesses forward to the connectors just behind the
seats, on either side of the area just uncovered by removal of the fuel
tank cover / package shelf. Unplug the connectors, untangle the harnesses
from the wire holders and other wiring, push the bulkhead plugs through
and pull the wires through into the wheel wells. After the roll bar is
bolted in, drill a 3/4" hole just far enough to the front or rear
of the foot plate to clear, reroute the wiring and reinstall the bulkhead
plugs.
4) REMOVE THE LOWER SEAT BELT REEL BOLTS (16mm pre'94 17mm '94
and later) AND SPACERS. Also remove seat belt reel alignment screw at
the top of the mounting bracket (small screw w/ 10mm head). Pull the complete
assembly forward and bend the alignment tab down flat, this will allow
the reel to tilt inward for better seat belt alignment and retraction
after the bar is installed. GO TO SEAT
BELT REEL & GUIDE INSTRUCTIONS
5) GO GET SOME HELP!
6) Y'ALL SET THE BAR IN THE CAR - BE CAREFUL The rear brace foot
plates will just fit under the front edge of the package tray, work the
rear braces past the several wiring harnesses in this area being careful
not to mess up any of the wiring. Also watch the front mounting plates,
they will be very close to the seat backs at this point. The horizontal
mounting plates half way up the bar should fit over the top of the seat
belt tower and align with the bolt hole that held the shoulder harness
guide. The lower mounting points align (hopefully) with the lower seat
belt reel bolt holes. The roll bar plates fit against the seat belt reels
which stay in their original location but do not use the original spacers.
(FIG# 1) Once the Sport Bar and
those rascally seat belt reels are in position start but do not completely
tighten the seat belt reel mounting plate bolts from the hardware kit,
make sure that your seat belts are on the inside of the roll bar.
Using the bolts and spacers from the hardware kit, install the upper mounting
bolts through the upper mounting plate with the spacer under the plate
in place of the original shoulder harness guide bolt and spacers, (FIG#
2)if you have a problem with alignment partially tighten the seat
belt reel bolts and pull the rear braces toward the rear by reaching through
from the trunk. Be sure the trim cap mounting washers are under the bolt
heads, we want this thing to look nice when you get done! The shoulder
harness guide is NOT installed at this point, DO NOT install the guide
under the mounting bolt.
Attach the seat guide to the bar through the smaller hole in the upper
mounting plate using the bolts, washers and bushings supplied in the hardware
kit. (FIG# 3) Be careful, don't
drop any hardware down in the seat belt reel. Tighten to 20 ft-lbs. Once
you have the seat belt reel and the upper mounting plate bolts started
and no wires are pinched tighten them to 50 ft-lbs
7) JACK UP THE REAR OF THE CAR AND SUPPORT WITH STURDY JACK STANDS
- Remove the wheels and plastic splash panels from the front of the inner
fenders. (pre 99 - 4 bolts w/ 10mm heads / M2 - 4 plastic fasteners w/
Phillips heads)
8) GET THE DRILL AND SAFETY GLASSES - Locate the position for
the rear back-up plates by drilling the first hole down from the top.
It's tight in this area, an angle drill is helpful but not absolutely
necessary to do these holes. Once you get the first hole drilled, bolt
the back-up plate in place, the others can be done from under the car
using the back-up plate as a template. (FIG#
6) The nuts closest to the frame rail do not use washers because of
their proximity to the rail. (FIG#
7)
The front plates are easy, just drill from the front and bolt the back-up
plates in place using washers under all nuts and bolts. Tighten to 35-40
ft-lbs. Spraying the back-up plates with undercoating after the fasteners
are tight is a good idea. Install the splash panels, rear tires, trunk
panels and spare.
9) Check convertible top clearance - it may be necessary to adjust
the top frame to allow clearance when the top is lowered and raised especially
with the covered bars. Raise the top slowly checking clearance as the
hinge points come up past the bar. If the hinge points rub loosen the
(3) bolts with 12mm heads behind either doorjamb that hold the top frame.
Pull the frame as far to the rear as possible, you might need to lift
the top slightly to allow more movement. Tighten the bolts while holding
pressure on the top and recheck clearance. See
convertible top adjustment page.
10) TRIM THE FUEL TANK COVER - On the pre 99's it's a small notch
at the rear corners.
The M2 requires a notch on either side, use the bolt holes for reference
points. Bend the rear corners to clear the bar until the panel is in place
then flatten into place. Install the fuel tank cover, raise the top put
the carpet back in place and trim around the roll bar.
11) CUT QUARTER TRIM PANELS - This will only hurt a little. In
order to reinstall the trim panels they have to be cut into two pieces,
it's not really all that bad, it just takes some time to do it right.
I use a small air powered reciprocating saw to do the dirty work, but
a hacksaw or a pair of aviation snips (tin snips) will do just fine. It's
fairly evident as to where the cut needs to be made, just cut the panel
and trim to fit up to the roll bar, but maybe (FIG#
4b) will help to make things easier. A belt sander gives a nice straight
finished edge but a large fairly coarse (wood type) file will suffice.
Take several small cuts to get a good fit, you can always take more off
but it's hard to put back. In addition to the vertical cut, a semicircular
area will have to be removed along the outer top area of the panel to
fit up to the bar. (FIG# 4a)
The final cut is to elongate the seat belt hole, trim to the vertical
edge, cut the end off of the rectangular seat belt trim rings that were
snapped out of the quarter trim during the disassembly so that they will
fit back into the elongated seat belt holes and butt up against the roll
bar. (FIG# 4a)
12) REINSTALL THE REMAINING PARTS - You will have some leftovers:
seat belt reel spacers, bolts and screws, shoulder harness guide trim,
bolts and spacers. HAPPY MOTORING
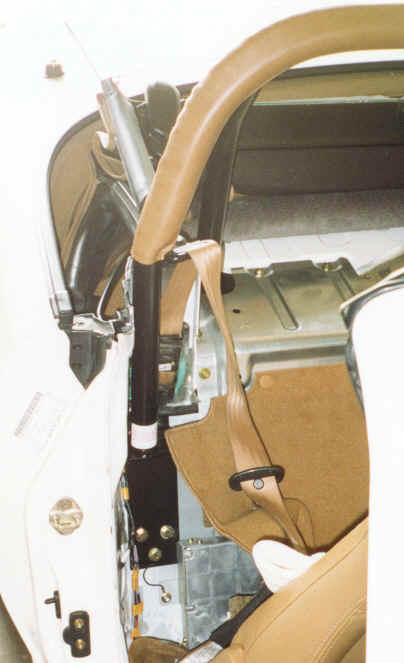
Image 1
|
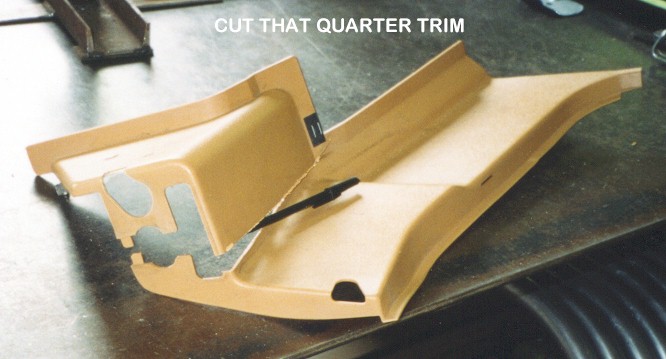
Image 2
|
|
|
| WARNING: This article is sold without warranty,
expressed or implied. No warranty is made to this product's ability
to protect the user from any injury or death. The user assumes that
risk. |
Updated
August 6, 2005 9:39 AM
|


;)
;)