| Bethania Garage Inc. & Hard Dog Fabrication |  |
| Home > Hard Dog Roll Bars > Miata > Installation Instructions | |||||
|
M3 Sport Installation
Instructions
|
|||||
|
|
HARDWARE KIT:
|
TOOLS NEEDED:
|
|
||
|
1) Unsnap and remove front hoop covers then remove the phillips head screws holding the rear hoop covers. ;) ;) ;)
2) Pull the center to release and remove the reusable plastic rivet fasteners that hold the shoulder harness guide covers. Pull forward on the front and straight up on the top to release. Slide the belt out through the provided slot and remove the cover.
3) Pull up on the door seal protectors, unsnap and remove.
4) There are some more of the plastic rivets holding the quarter trim on either side behind the seats. Remove the fasteners to free the panel.
5) Pull down on the top release handle and remove it. Pull up on the windblocker and remove it also. This one is tight and can be a little stubborn.
6) Pull up on the panel at the rear of the console. This one can be difficult also, pull vertically with a slight twist to get it loose. Be careful the clips are tight and easy to break.
7) Remove the fasteners from the large plastic bulkhead behind the seats, separate the front from the rear at the top, rotate forward, push back just behind the console to allow the tab that slides under the console to clear and remove from car.
8) If you have speakers, unplug and remove them together with the bracket by removing the 3 nuts w/ 10mm hex heads.
9) Remove the top latch from the cross brace by removing the 2 bolts w/ 10mm hex heads.
10) Loosen the wiring harness clips and seat belt guides. Unbolt and remove the cross brace and hoops with the rear plastic trim still attached. Unsnap the plastic cover and remove the fasteners with a door panel tool, screwdriver or claw hammer. Save for reinstallation.
11) Set aside the long cross bar mounting bolts. Save the other fasteners as we will be using them to install the roll bar.
12) Remove the fasteners that hold the side and rear plastic interior panels remove the upper and lower side panels and the large center panel.
13) If your bar does NOT have a harness bar you will need to cut the
stock cross bar to fit the brackets on the roll bar. After the factory
cross bar is cut attach it to the roll bar using the screws supplied.
Put the cross bar in place, drill a 1/8" hole and install the screws.
14) Set the large center plastic panel back in place but do not install
any fasteners. Put the roll bar in place working around the panel. It's
tight going over the rear main hoop mounting studs but it will go. Bend
the edges of the metal bulkhead as needed to clear the rearward braces.
After the upper reinforcement plates are in place and tightened let the bar sit back in place. Attach the bar using the stock bolts and nuts but do not tighten. Install the lower braces to the bar using the supplied 5/16" bolts w/ washers in the outer holes and the larger 3/8" bolts w/ washers in the inner holes with the bolts oriented front to back. Install the nuts on the back side, no washers are required for the self locking flange nuts. Use the stock bolts to reinstall the braces to the body. Tighten the upper bolts, side braces and rear foot plate nuts first and then tighten the forward foot plate bolts last. Raise the rear of the car, put on jack stands and remove the rear wheels. DO NOT jack up one side at a time as this will twist the chassis and cause issues with the roll bar fitment. From the top using a 3/8" drill bit drill through the rear plates and install the back-up plates in the wheel wells using the supplied 3/8" bolts, washers and self locking nuts. Torque the 3/8" bolts to 33 ft/lbs, stock and 5/16" bolts to 25 ft/lbs.
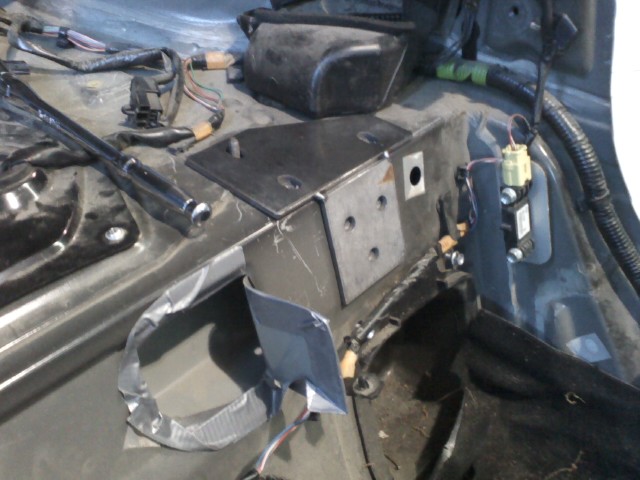
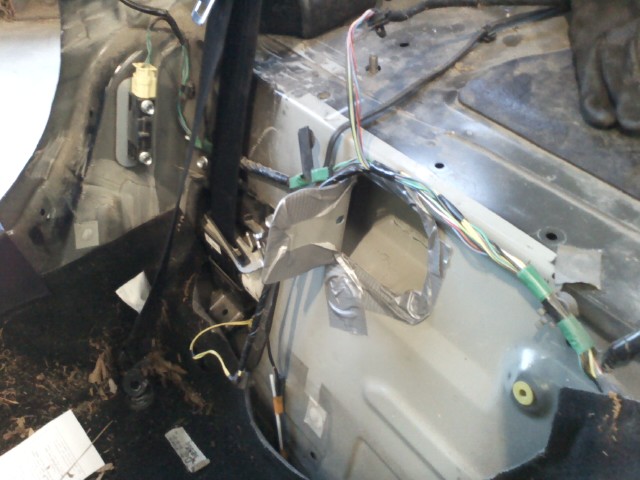
15) Open an access hole large enough for your arm in the channel that runs behind the seats using a jig saw with a fine tooth metal cutting blade, or some other tool appropriate for light sheet metal cutting. Start in the preexisting factory hole and cut back toward the door as seen in the photos. Duct tape around the edges will cut down on blood loss considerably. Drill 3/8" holes into the channel. Insert the reinforcment plates with the prewelded nuts and bolt them in place to 33 ft/lbs. The sandwiching of this double walled panel adds considerably to the strength of the main hoop mounting. Once the plates are installed bend the flaps back into place and seal the crack with duct tape. This proceedure in no way compromises the structural integrity of the vehicle.
16) Trim the lower rear panels and upper rear panels to fit around the rearward braces as shown and reinstall. Cut the flanges for the stock hoop covers from the front and rear plastic panels flush with the top of the panels. If your bar has diagonals, elongate the center holes to accommodate the diagonals. Install the rear of the panel to the bar.
17) Reinstall the top latch. If you have a harness bar use the 1/4" bolts and nuts provided. Check the latch adjustment. Install the speakers, large front panel, shoulder harness guide covers, quarter trim and door seal guards.
Updated
July 9, 2010 1:27 PM
| |||||

;)
;)
;)
;)
;)
;)
;)
;)
;)
;)
;)
;)
;)
;)
;)
;)
;)
;)
;)
;)
;)
;)
;)
;)
;)
;)
;)
;)
;)
;)
;)
;)
;)
;)
;)
;)
;)
;)
;)
;)